DIY Halloween ghosts for your yard
Skill Level: Beginner | Estimated Time: 2-3 hours
Chelsea Lipford Wolf, Expert Blogger:
I’m not much on the spooky, ghoulish part of Halloween. But cute ghosts and smiling jack-o-lanterns are all good! So I thought creating a set of friendly ghost yard decorations would be a fun and easy project.
Things You’ll Need
Here are the materials I used to complete this project:
- (3) 2′x4′ pressure-treated plywood or (1) 4′x8′ sheet
- Pencil
- Matrix
- Jigsaw attachment
- Sander attachment
- Exterior white paint
- Paint brush
- Black craft paint
- Small artist brush
- (6) One hole straps
- (12) 1/2 in. #6 wood screws
- (12) #6 Washers
- (6) 2-foot garden stakes
Step by Step Instructions
I started with pressure-treated plywood. Instead of buying a full 4′x8′ sheet, I went with (3) 2′x4′ sheets that are ½ inch thick. They are a little more expensive, but worth it if you don’t have a pick-up truck.

From the start, I didn’t want my ghosts to be identical, so I traced 3 different-shaped ghosts on the 3 pieces of plywood. I also varied the height of them, but none were taller than 3 feet.
Once I was satisfied with the outlines, I snapped in the jigsaw attachment for my Matrix and cut away!

It really came in handy at the bottom of 2 of my ghosts where I created a zig zag.
Then it was time to sand every surface of all of the ghosts to get rid of any splinters.

Here I skipped the priming step and bought exterior self-priming paint so I only had 2 coats to do instead of the usual 3. I bought the off-the-shelf flat paint. No mixing colors are required.

As expected the first coat of paint didn’t cover it completely. Some of the grade stamps on the wood were still shining through.

Before I painted the second coat, I inspected both sides and picked the best-looking one to be the front. And then I only painted the front side since the back won’t really be seen.
Next, I was ready to give these ghosts “life” by painting on some eyes! I used black acrylic paint found at a craft store and a small artist brush. Each ghost also got a different pair of eyes.

Using ½ inch #6 wood screws with washers, I attached (2) ½ inch one hole straps per ghost. You can find the straps in the electrical aisle at the home center.
These will hold the green garden stakes in place. So I laid out a stake with about 7 inches hanging off of the bottom to determine where to attach the strap.


If you decide to move your ghosts around or bring them inside, the stakes will be able to slide on and off with ease.
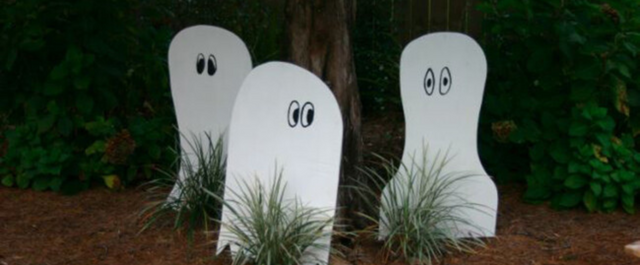
With the assembly complete, it was time to put the ghosts in place! A few of the stakes required a hammer to get them deep enough in the ground. I have 3 plants around a tree in my yard, so I placed one ghost behind each plant.
I think it looks as if the ghosts are trying to hide behind them but don’t realize how big they are! With that little bit of comedy and their innocent eyes, they certainly aren’t scary ghosts! But they’re a fun and lively addition to my Halloween and fall decorations!

